We are now going to be moving on to the nitty gritty of this Bible. First of all we will be looking at positioning, where to stand in certain situations, positioning when engaging in fights, and where you need to be to help maximise your potential.
This is going to contain some amazing artistry.
What are we trying to achieve?
One of the main things that I see most Demomen suffer from is poor positioning, most don’t understand the importance of the class and what they can do with it. Just by staying alive and keeping an eye on where they stand a Demoman can completely delay a push giving their team more time to spawn, he can turn a fight around in to his favour and he can dictate an entire push to last.
Speaking from my own experience as a professional overextend-oman, keeping an eye on your positioning will no doubt help you push out any bad habits relating to overextending. Most of the time you will find that when you are overextending you are just asking too much from yourself. By keeping yourself to a strict set of rules you will make sure that moving forward will only happen when certain criteria are met (this is more advanced stuff though which I might go through in the future). For now we are going to be looking at the things you need to do to keep your position in check, how to use your positioning to get the most out of your class, and what to look out for in certain situations/maps.
For myself I had to work pretty hard to actually grind it out of my game, so for those that aren’t as new to the game and still have troubles with overextending the only thing I can recommend is that you really just go over your demos as much as you can.
Let us begin.
Smashing your opponents with positioning
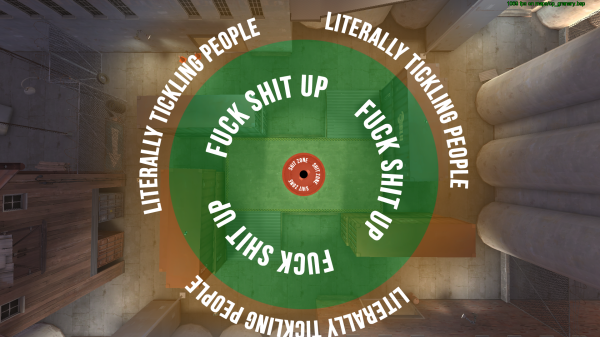
Just take that image in for a moment and let it soak. Make sure you open it up in full screen for added effect. This is a rough “dm zone”. With this you can get a visualisation of your reach as a Demoman. I must remind you though that this is only a rough visualization that is meant to help you understand the importance of position. You can use it as a foundation on improving your positioning once you become more comfortable with the class and gain more experience.
For a brief explanation: the red area is where you can hit people, but you’ll take self damage, so it’s an area that’s to be avoided. Most of the time however someone will only be in that area if they jump on you. There are still many times where I see demos moving too close. This means they can get themselves surrounded and start taking self damage every time they attack. It’s best to look at the Demoman as a glass cannon – you really need to keep an eye on your position so you can do your job efficiently and still survive. You need to ensure by keeping your distance that you become a lot more effective in what you need to do, although even I sometimes still get in too close and end up dying due to self damage.
The green section is naturally the area you need to aim for when engaging in fights. This area is more or less the maximum range of stickies without charging them, so you’ll be able to throw them out without any delay and maximise your damage per minute. By keeping everything in this green zone you will be able to dominate the fight and also keep a safe distance, which in turn will reduce the damage that you will take. You can get a feel for this general zone by just going through some maps and spamming stickies everywhere to learn where your limits are on each map.
Finally, the orange section is pretty much just an area that is out of reach – you can launch stickies there but it can someone achieve mixed results. I sometimes see players spam out these areas too much instead of moving slightly forward. By doing this you are chewing up ammo on something that may not necessarily gain anything. For now I’d recommend reserving long-distance spamming for just targeting medics to try and get the early force or to pad your damage stats on logs.tf.
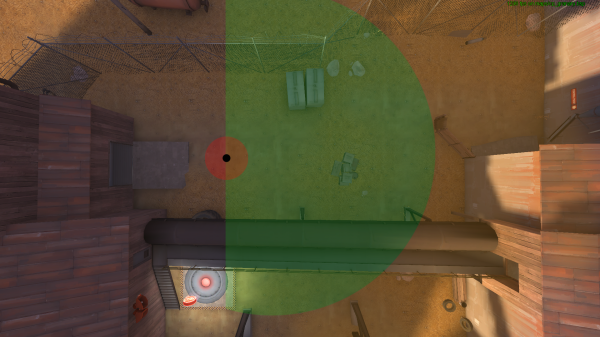
The 180 rule
Okay, so this is a good way of improving your positioning. It’s pretty self-explanatory from the picture above, but what you’re trying to achieve is that everything that you need to have vision of is always in front of you. This is to make sure that you don’t get caught out by something that could easily come behind you and it also helps to discourage overextending. By keeping to this rule you will always make sure that you’re in a good position, and being caught out should happen a lot less often.
The only issue with following this technique by the book is that your aggression can be a bit mistimed. However with a lot of practice you can get around that downside. Let’s take a look at another example in this MOTHER FUCKING SLIDESHOW WHUT?!:
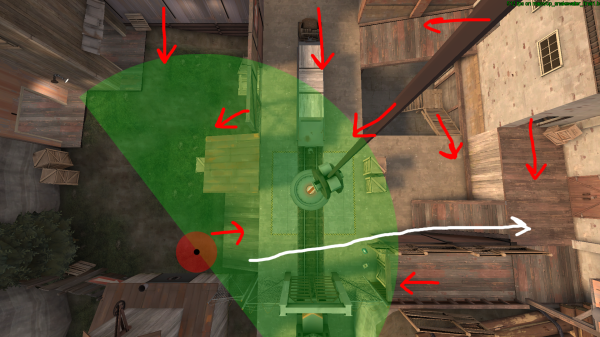
So as the captions already explained, you’re basically just preparing for an engagement. Naturally you’ll have your own sticky trap there but the main thing is that you’re in a good place to fight. One of the main issues with Demoman is that sometimes you can find yourself overwhelmed with options when you go in too deep, you’ll be presented with too many targets and once the enemy starts splitting up it makes it harder for you to really single someone out. Maintaining a somewhat distant position means you will have a clear objective and a clear target.

These red arrows just show where enemies are going to come from, not all at once though, unless you’re playing Highlander, but no one can organise any form of coordinated attacks in Highlander so it won’t happen then either. The white lines are there to represent where you would push from this position, so it’s only really right to stand around here when wanting to push straight from bottom or on to bridge.
These red arrows show where enemies are going to come from – not all at once though unless you’re playing Highlander, but no one can organise any form of coordinated attack in Highlander so it won’t happen then either. The white lines are there to represent where you would push from this position, so it’s only really right to stand around here when wanting to push straight from bottom or onto bridge.
Going back to what I was saying about being overwhelmed in a push or when being pushed, Snakewater second is one of the main areas where you can witness this kind of thing first hand, if you’re going for a non uber push through grass and enter on second, some people like to move on to the point and slightly above it. Now the issue here is that you are giving yourself a lot to look at, you have the main positions covered but with it being Snakewater and there being a lot of opportunities for people to get behind you this really isn’t the best location to stand. Not only that but if someone was to jump at you from in front, it will be very difficult to get hold of the situation once he is dead as you have a lot of places to cover visually. Once a fight has broken out this is where you can find yourself stuck in the middle, you’ll have very little safe cover, a poor retreat path and in a situation where you will just be overwhelmed.
A slightly more passive approach but it offers a lot more safety.
Now with this example you can see a much more focused approach. By stepping a bit further back you gain a better retreat path, more vision and if a fight were to break out, you gain a lot more options. Not only that but anyone that wants to jump you will have to overextend a lot more to actually reach you and as you are in a wider area, you will have better opportunities to escape or surf away. From this position you can also take control of the right side of the second point, move up up the ramp on to the balcony area yo cut off lobby stopping any further aggression, get greater vision of the surrounding area meaning you can call out anyone behind or people hiding in cheese etc.
Again as mentioned above, the only downside to this is that you won’t be as much of a force at the get go, but once you gain a bit more experience, you can start taking more advanced positions from the start. One of the main things you can do when deciding whether or not to take this position is count their players. If you see 3/6 players in their lobby or balcony and you know nobody has died on their team in the last 20 seconds, it’s probably best to take the more reserved approach for the time being, as they could possibly have players behind waiting to make a play. If you see 4 or 5 players then you can take a further risk and start making up that ground for your team.
You can flip this same position to the other side of Snakewater second for pushing out from saw room, buy you will need to be slightly more reserved since pushing out from there doesn’t give you vision of the bridge so it can open your team up to getting bombed easily. However like pushing from grass you are pretty much able to get vision of most of the second point, giving you more information for fighting.
As a general rule of thumb for new players/teams on pushing second:
Uber vs. Uber, some of them are dead: saw room, out of window, and go lower. If they contest with uber to block second, trade with them but have one person (soldier or scout) going behind them through lower and to their lobby, this is to cut off reinforcements or take people out once the uber exchange is done.
Uber vs. Uber, none of them are dead: push from grass. Send 1x soldier forward to make space, 1x scout to get on the train for any jumpers.
Uber vs. Non Uber: push from saw room.
Non Uber vs. Non Uber: push from grass.
Maps
I’m going to touch on this very briefly, but this is one that most people don’t really pay attention to. I myself used to be one of them. Basically every map is (obviously) different, so this means that some of them do require an adjustment in how you play. Some maps are incredibly well suited to the Demoman (Gullywash :D), others not so much. I’ll go through a few just so you can know what to look out for on some of the others.
Granary
Strong classes: Soldiers
Weak classes: Scouts/Demoman
Strengths: Sticky trap opportunities
Weaknesses: Flat surfaces make it easier for soldiers to juggle you, a lot of the exits have small doorways for you to get caught out on. Middles are sometimes a stab in the dark, with unpredictable jumps from soldiers. Last point is very open and it’s easy to get overwhelmed.
Things to think about:
- Can I just walk away?
- Can I back out as soon as they push in?
- Will I take self damage from fighting in my current position?
- If I die now, will I be alive in time for last?
Process:
Strong classes: Roamers, Snipers & Scouts
Weak Classes: Pockets & Demoman
Strengths: Sick airshots, fast roll-out opportunities (apart from on LAN grand finals), Kritzkrieg.
Weaknesses: Open chokes for Roamers, free space for snipers, good flanking opportunities for scouts. Shittest last that can rival Snakewater.
Things to think about:
- Can a roamer jump in and reach me from here?
- Do I have support from a scout?
- Is our PC/Sewers checked for people hiding?
- Why is last so shit?
- how do rollout?
Gullywash (was my favourite despite a certain i52 result)
Strong classes: Demoman, Pocket Soldiers & Snipers
Weakclasses: Scouts & Roamers
Strengths: Confined spaces, small choke points with good areas to fall out of. Dominant position for Demoman on mid fights. The entire fucking map is a playground.
Weaknesses: Snipers can easily cause a problem. Pushing last can be a pain without good coordination.
Things to think about:
- What is their set up on last?
- Do they have a sniper hiding in forward spawn?
- Do they have a sniper at all?
- Where’s there sniper?
- Can you see him?
- I thought running two was banned!?
- Why didn’t seagull tell me it was Froyotech’s best map before the grand final?
There is just a few examples on some of the maps. It’s a good thing to try and apply the same thought process throughout all of the maps to help you gain a better understanding on what you need to be careful of when playing them. You will find that your positioning becomes a lot more consistent the more you study the map itself.
Closing thoughts.
So yeah, going back to what I’ve been saying this whole time, just really start focusing and taking in to account your position. It will really help you improve as a player and help you feel in control of the games that you play.
Anyway, that is all for now people, I will be doing another article but haven’t quite decided on the subject. It should be done in a week or two.
Love,
WARHURYEAH


Thuuuuu
/ January 16, 2015i wish i could have read this earlier
thanks for answering some of the questions i had in my head
Don't
/ March 5, 2015Sweet guide. Very nice map analysis.
Flamingcatturd
/ April 1, 2015I just found your blog and these guides are wonderful and very entertaining. I just sent links to all of my 6v6 team members. I do hope that you continue these.